
Start With the Gaps, Not the Door
Many garages leak heat and water in places that are not related to the door. The frame seals, the floor gap, the track brackets touching exterior metal, these are the things that make a mess of an otherwise good installation. Before you slap down money for a new door or insulation product, walk around what you already own. An honest audit will let you know if you need to swap out components or simply shore-up the weak links.
Choosing the Right Door For Your Climate
Homeowners residing in coastal areas might encounter issues that differ from homeowners in dry inland regions. Salt air speeds up corrosion of hardware and tracks. Meanwhile, high winds can create structural stress on panels, which a standard residential door may not be able to withstand. If you’re in a storm-prone region, verify the wind load rating of any door you’re considering. This is often listed in the product specifications and indicates the amount of pressure the door can take before it deflects or fails.
For those seeking professional-grade alternatives, sourcing through garage doors adelaide specialists provides you with local knowledge of necessary coastal-specific requirements, such as marine-grade hardware and doors engineered for wind events, which a standard hardware retailer won’t have on their radar.
Windows in garage doors elevate complexity. Double-pane glazing significantly outperforms single-pane glazing across temperature extremes, but any fenestration is only as strong as its weakest seal if the glazing breaks. This means more potential weak points. If the door does have windows, inspect the glazing seals on the same necessary maintenance schedule as your weatherstripping.
Find the Actual Weak Points First
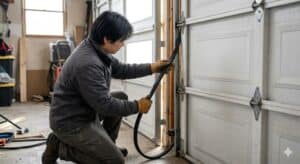
Close your garage door on a bright day and stand inside with the lights off. If you see daylight anywhere around the perimeter, you’ve found your first problem. Weatherstripping, the jamb seal that runs along the sides and top of the door frame, hardens and cracks over time. Brittle seals let in air, dust, and moisture even when the door is sitting fully closed.
Run your hand slowly along the seal line. If it doesn’t compress when you press it, it’s lost its function. Replacing perimeter weatherstripping is a low-cost fix that makes an immediate difference, and it’s worth doing before you assess anything else.
The bottom of the door is a separate issue. The astragal, the rubber strip along the base, handles the seal against the floor. The problem is that on uneven concrete, it can’t do the job alone. A threshold seal installed directly on the floor creates a secondary barrier, and the two together form a dual-barrier system that stops driving rain from working its way underneath during heavy weather events.
Why Retrofitting Insulation Often Falls Short
If you’ve ever taped reflective foil insulation to the back of a metal roller door and wondered why it didn’t seem to do much, here’s the reason: thermal bridging. Heat doesn’t just move through the panel material, it travels through the steel frame, the hinges, and the track brackets. Foil installed behind the panel does nothing about the frame itself. You’ve insulated one path while leaving others wide open.
Factory-built sandwich-construction doors address this differently. Polyurethane foam is injected directly between the inner and outer skins during manufacture, which bonds the panel together structurally, and eliminates the air gaps that make retrofit solutions inefficient. High-quality polyurethane insulation can reduce heat transfer through a garage door by up to 75% compared to a single sheet, uninsulated metal door (Door & Access Systems Manufacturers Association). Polystyrene panels exist as a lower-cost alternative, but they don’t bond to the skins the same way, which reduces both the R-value and the rigidity.
The other issue with metal-framed doors is thermal break, or the lack of one. If the track hardware makes direct contact between the door frame and your exterior wall cladding, you’re conducting outdoor temperature straight into the structure. Foam-backed gaskets or rubber isolators between the bracket and wall can interrupt that path without affecting how the door operates.
Don’t Seal the Garage Airtight
This is the one that people keep forgetting. Insulation and seal are important, but believe it or not, you don’t want a garage that’s completely airtight. Vehicles off-gas moisture and combustion by-products. Tools and stored materials contribute humidity. Without ventilation, that moisture has nowhere to go, and the result is vehicle corrosion, mold on stored items, or rot in timber framing.
Passive vents positioned high on the wall opposite the door allow moisture to escape without creating a draft at floor level. If you’re converting part of the garage to a workspace or living area, a simple exhaust fan on a humidity sensor keeps conditions stable year-round.
Where to Spend Your Effort
First, focus on the seal system which includes perimeter weatherstripping, astragal, and floor threshold. This is the most cost-effective place to start. Once those are in good shape, you’ll instantly notice improved temperature stability and moisture control. Next, move on to insulation upgrades and door replacements. They will work more efficiently as the envelope they are working within will be in good shape.


